Tuesday, 16 February 2016

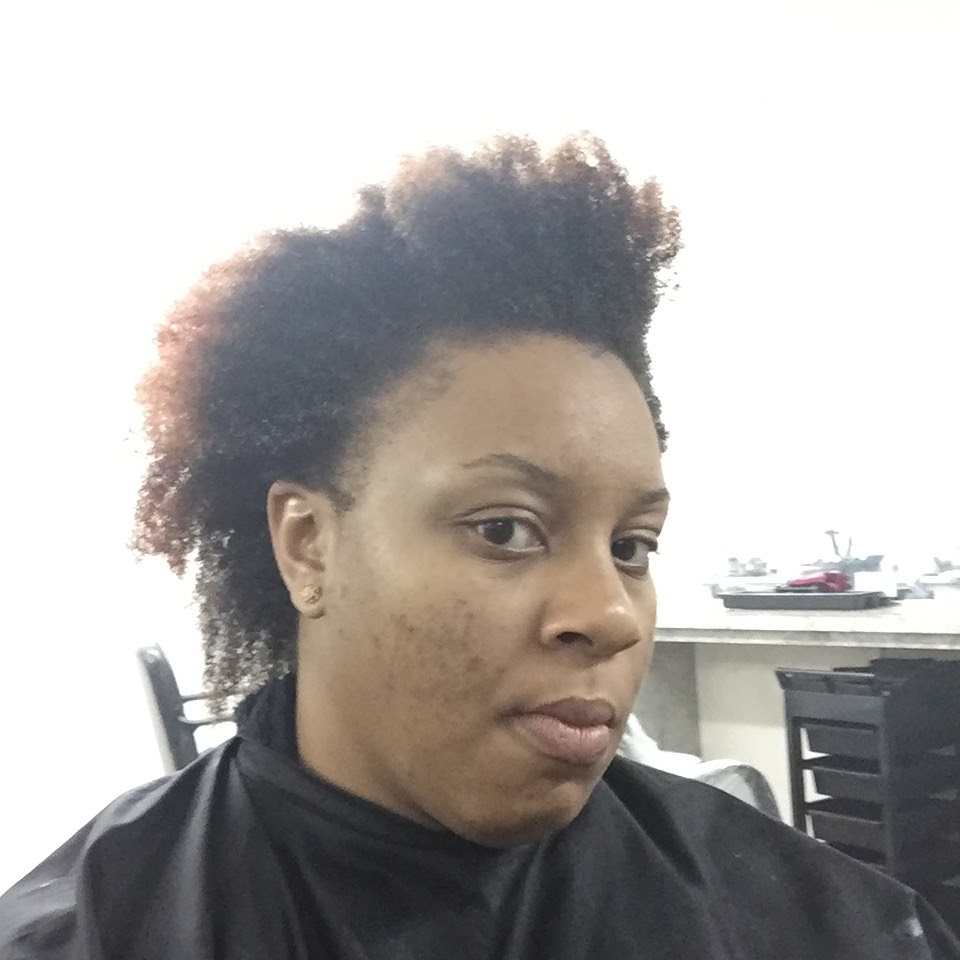
Love your hair and slay featuring Dania

1.   


   What’s your name and where are you from?
Dania Rolle, from Nassau Bahamas.


 How long have you been natural?
I've been natural from 2013. 


Did you Big Chop or Transition?
Both. I transitioned from 2013-2014 then in 2014 I shaved the back and side. 2014-2015 I let it grow and clipped the top to be the same length...I still have some evening off to go.

    What lead you to undergo a natural hair journey?
   I always wanted to know how my natural hair looked. I was always a hairdresser kind of girl. Always permed and every strand in place. As I got older, I became more curious. I decided to be Me. Idk if 'going natural' is a statement I can agree with because I've always been natural. I wanted to stop perming and anything that wasn't me (weave etc).


      Have you always embraced your natural hair? If no, has that changed?
I  I've never known my natural hair so this is the first time in my life I have had the opportunity to embrace it.

      What does your hair routine look like?
    Hmmm.... I get help from a natural salon for treatments etc.  At home I oil and moistruize as needed everyday.


      What’s your favorite way to wear your hair? 
     I love my hair any style once groomed makes me feel good inside.


    How has your view of natural hair changed since becoming natural?

      Well my view on natural hair hasn't changed..A woman's hair is her beauty...the only difference now is that my hair curls up nice.

  
  What are your hair goals for 2016?
     For 2016  I just want my hair full, thick and healthy.. I know length will come eventually

  
    One piece of advice I’d leave with another natural/transitioner is: 


     to love your hair and it will for sure love you back. Be patient. And slayyyyy

Monday, 11 January 2016

1 year Natural featuring Tejada


What’s your name and where are you from?
Tejada Sands, and I’m from San Salvador.

I remember sharing your photo post big chop last year, how would you describe your hair 1 year after?
 One year after, I can say that it’s still manageable. I enjoy seeing the growth and knowing that it’s healthy. I have a scalp condition, seborrheic dermatitis and it always required me washing often. Therefore, being natural was the best way to handle it, even though it’s still not the easiest of processes.

Were your friends, family, supportive during your hair journey?
I won’t say that they were unsupportive, just misinformed. This issue to them was , how was I going to deal with the hair. There were those that also like that I made the change. Now, it’s not really such a big deal, nor did it ever bother me.

What lessons have you learnt about yourself and your hair during this past year? Would you do anything differently?
This journey is really teaching me patience. The styles don’t always come out how I want, and I think that’s my biggest issue. Sometimes, I do wish I had a different type of hair, just for styling purposes, but for the most part I enjoy what I have and embrace it. So, being able to embrace my hair was also a big lesson. I honestly don’t think there is anything that I would do differently, maybe do the big chop earlier so that my growth could be even further along. 


If you could go back a year, what would you tell yourself about your natural hair?
I would probably tell myself to be more adventurous with it.

What are your current hair staples?
Oils that can be found in my pantry: Olive, coconut, grapeseed. Ecostyler gel and a really good leave in conditioner, currently using the Cantu leave in cream. Once I’ve emptied a product I like to try others as well.

What’s your go to hair style?
Now that it’s long enough I’d say a puff.


Who are some of your natural hair inspirations?
I don’t really have any per say, there are some youtube stars that every now and again I catch up on, but I found I’m not really hair obsessed so I don’t spend a lot of time on it. But journeytowasitlength, and Naptural85 would probably be 2 that I follow.

What would you like to see more of from the Bahamian natural hair community?
I’d like to see more natural hair events and meet ups. Even though there is an online community there isn’t a huge personal interaction community. I’d also love to see more naturals blogging and vlogging. We have a lot of talented naturals and they should share those talents with the world.


Blessings & Love,
Drea


For natural hair features and business inquiries email 242naturalista@gmail.com

Saturday, 2 January 2016

A journey from Loc'd to Unloc'd


What’s your name and where are you from?
My name is Shanel L Adderley and I'm from The Bahamas.


Have you always been natural? 
No I haven't always been natural. In starting college and knowing the career I wanted to be in, I knew I would not be able to maintain permed hair. I started college August 2010 and in February 2011 I decided not to perm my hair anymore. 

Why did you start your loc journey?
In August 2011, after reading up on locking hair and talking to persons who had loc'd hair, I decided to loc my hair. But I can truly say seeing my aunt's hair loc'd gave me more confidence to go ahead with it. 


 What made you end your loc journey?
I ended my loc journey due to my hair being damaged after bleaching it the second time. It was shredding a lot and dropping off when it got wet. Then I also got tired of the locks, but now I miss them. Funny aye!  

 How did your family/friends react to you locing and unlocing your hair? 
 When I first started  loc'ing my mom had a lot to say. I remember her saying if this was something I was sure I wanted do and that she wasn't a fan of it. Everyone else  seemed cool about it.

What are your favourite products for loc’d hair? Are you using the same products post unlocing?
I was never the one to use a lot of different products for my hair. Washing my hair the majority of the time was when I went to my hairstylist and it was whatever she used. I was fine with that. If I did wash my hair at home I use suave shampoo and conditioner.  But I never had a certain product for it. I would kept my hair in the same hairstyle until I went back to my hairstylist. Lol...I am just one week into learning my natural hair so I do not have certain product as yet. I was told different hair requires different products

 Do you have any favourite Bahamian natural hair salons? 
Mmmmmm....I really do not have any favorite natural hair salons but I will recommend Lion of Judah by Toya, Rose, who is currently situated in Eleuthera and Sherilyn, at the Hair Clinic.


What advice would you give to other 242Naturalistas loc’d and unloc’d?
My advice to other naturalists lock'd and unloc'd would be, one, our hair is our beauty, two, we have to take care it because no one will, and finally, what will work for someone might not work for you.

Thank you once again for the privilege to express my journey and I hope it will be an encouragement to all natural, permed and bald.

Saturday, 22 August 2015

6 Tips for Back to school


As the beginning of a new school year approaches, I thought about making some changes to the blog like sharing more or my experience as a medical student and also how I keep up with my relatively natural lifestyle while in school. I said relatively because some days,  I have to choose studying over bedtime, exercise and meal prep.


As a a professional student (7 years post high school with a ton more to go) I wanted to just pop on here and share some things I've learned form being in school all these years, this is by no means an exhaustive list but I do hope that the 6 tips below can help you to navigate this new school year. Whether you're starting or continuing the bits below can help you to face the new school year with grace. Well anyway, here goes..

1. Find your study style and stick to it.
 Most colleges have some guides to help with this. I remember in undergrad our counselling department did sessions on study styles. To some people its something to skip over but its really beneficial to quality studying. If your find out early how you study best it'll save you quite a bit of time in the long run preparing for tests and exams.


2. Meal prep when you can.
 Fast food as convenient as it is makes you pretty sluggish. I usually set aside Sunday to meal prep for at least 3 days out the week  because i'm one of those nap, eat, study kind of people, you know the ones that roam the fridge just after waking up. Studying makes you hungry and if you have good options to eat readily available you won't settle for the junk that you'll regret later.

3. Talk it up
I use to be one of those kids who wasn't big on office hours in undergrad but i've learnt that they are beneficial. If you don't understand something, block out some time and find that teacher/professor. Teachers really appreciate when you come in and they can do the rest of their job that can't be completed in a 1-3 hour block in the classroom. In most colleges/med schools office hours are given but you will notice that professors will not run behind you to use them. Trust me when I say this, good students know these hours and use them regularly.  Don't forget to have at least 1 friend you can hash school work out with (2 brains are often better than 1).

4. Make your notes understandable
It may take a bit of time but go through those notes and explain concepts in your own words, make it something you can remember. Whatever you find interesting is a good thing to use, because that'll make for notes you won't  ever forget. For me I call this #dreaspeak (dorky I know lol). I'm going to share with you something I came up with during my first semester of medical school

 eg. Haemalavendeta- Lavendar tube, EDTA as the chemical agent used for haematological studies

All great students are able to take the notes and concepts given and understand them so they can apply them. Through this process you'll develop what I like to call 'crib notes'. Crib notes will be all your jottings, acronyms, cooky phrases that remind you of info you've chunked in your brain. Looking over your crib notes will be like review after you've studied since they are condensed course notes.

5. Find the balance
My very first semester of med school almost ran me ragged. I studied so much and barely came up for air. Although the grades were great, I didn't do much but study. My second semester I decided to change that and took way more off days...bad idea. Finding the balance of school is challenging because there are so many variables like writing papers, studying, group work etc but let me remind you as I had to learn myself that if you don't take care of you all of the pushing will be in vain. I remember falling asleep in an exam...where dey do dat at? lol and also going blank until the last 10 minutes...It's only so much you can write in 10 minutes people but after that I learnt to try my best, study hard and take moments to breathe. No matter how small, sometimes just getting out of your room is enough, treating yourself to a good meal after an exam, a little retail therapy...whatever floats your boat.

Lastly,

6. Encourage yourself
There will be days no matter what programme your in and how long you've been in it that you will want to give up. Those are the times when you have to dig deep and motivate yourself. I keep a list of scriptures and quotes on my walls that I tend to refer to before I head out the door that keep me grounded and levelheaded.

I hope in some small way that these tips can help you to look towards the new school year with great expectation. Make 2015/2016 the best one yet.

With love,
Drea


Friday, 16 January 2015

The guide to protective style takedown

I know I'm late but Happy New Year Curlies!!!!


As I gear up for the protective style challenge I had to come on here and write this post. For those participating this will help you greatly, as well as those who may not be participating but are wearing a long term protective style. I know you're wondering long term protective style????, no its not another piece of natural hair lingo- it's just something I thought of. A long term protective style to me is any protective style that you wear longer than 2 weeks without manipulation. There are so many different protective styles and they are all good, once they don't pull on your edges and you continue to moisturize your hair underneath. Just like anything else under the right conditions your hair will thrive, under poor conditions like the aforementioned as well as improper hair takedown that's when protective styling becomes a nuisance.

For the past year I've been wanting to write this post as I've had so many friends who have never protective styled jump wholeheartedly into wearing braids because, well braids are easy, we're in med school and no one has a whole bunch of time to fix hair everyday. Most of them rocked braids for at least 2 months, took it down when they started to get really heavy but made the mistake of shampooing their hair. Most people don't know it but Shampooing your hair directly after a protective style is a big NO, NO! Why, because after having your hair has been tucked away for a long period of time its going to be tangled and matted in most areas and shampooing before detangling will only make the situation worse.

Before I get to the list of what you should do when removing a protective style, I want to remind you that regardless of how long you've had the protective style, know that you will likely see lots of hair loss. This is nothing to get alarmed about. No i'm not crazy.... Your hair naturally sheds about 50 to 100 strands a day on average. Wearing a protective style does not prevent hair shedding, but it prevents the hair from being released because the hair is tangled and much of it has grown into the the protective style. So therefore if you've had a protective style in for longer than a month you can expect to lose about 1500 strands which is going to look like a lot and for some this can be quite scary but if you look at it like I mentioned you'll notice that that is right within average.

The steps although few in number can be a bit time consuming so be mindful of that. Also, don't try to skimp by rushing the process, set aside a couple hours aside to do it properly because this process is going to effect your overall hair health and how quickly your hair bounces back. So onto the take down info. These are 242Naturalista's  steps for effectively taking down a long term protective style.

Step 1
- Release your hair from its protective style. Give your scalp a chance to breath for a few hours.

Step 2
- Use one of your favourite oils and give yourself a scalp massage using the pads of your fingers. Coconut oil is a great oil for this but if you're allergic you can use a bit of olive oil or argan oil. This will not only feel good but will promote circulation in your scalp and release some of the tension on your scalp that the protective style caused.

Step 3
- Grab a hold of a detangling conditioner (something with 'slip' that will make separating your hair easy - There are a ton of great 'slip' conditioners Some suggestions - Hello Hydration - Tressseme Naturals ) and a spray bottle of water. Spray your hair lightly and section it off into small workable sections. This will make the detangling process easy. Apply a generous amount of conditioner to each section and section it away. Let the conditioner sit on your hair for at least 30 minutes. A plastic cap will speed up the process.

Step 4
- Detangle your hair. Use your preference of tools, if your a finger detangler then do that, if you're about the comb life then do that. It's whatever works best for you. When detangling start from the ends and move to the roots. You may need to make the sections smaller or add more conditioner. As each section is detangled twist it up and move onto the next section.

Step 5
- You can let the conditioner sit in your hair for a few more minutes to continue to hydrate your strands then rinse out and wash as normal.

I hope this helps curlies. I look forward to your participation in the protective style challenge. Don't forget i'll be updating my instagram with my new hair styles and tips. Also keep using the #pschallenge2015 so that I can see the styles your creating.


Blessings and Love

Monday, 1 September 2014

African Pride's Shea Butter Miracle Intense Moisture Bouncy Curls Pudding Review

So after heading back to medical school  I realized I hadn’t packed any twisting creams or butters. Ugh! I didn’t want to make my regular shea mix as yet because it would’ve taken a while to locate all of the ingredients. What’s a girl to do with just conditioners? So in wanting to twist my hair I went to the nearest Pennywise, a local beauty supply here and I looked up and down and finally came across something I thought why not give it a try? I skimmed the ingredients and found the first 5 to be things I really liked and I also looked and saw a few of my favourite hair oils. So this is the review for.....


African Pride’s Shea Butter Moisture Intense Bouncy Curls Pudding


Product Description (taken from website- also listed on jar)
African Pride Shea Butter Miracle Bouncy Curls Pudding gives amazing manageability, softness and shine to naturally curly, wavy and kinky-coily mixed textures. Enriched with shea butter, it is nature's superior detangling moisturizer. African Pride Shea Butter Miracle Bouncy Curls Pudding helps eliminate dryness, enhancing body, bounce and shine. Regular use helps soften curls, coils and waves, elongate curls and kinky-coils, and smooth and tame frizz.

Ingredients list (Couldn’t find it online so I typed it out)
Water, Soybean Oil, Hydrogenated Vegetable Oil, Shea butter, Mango butter, Argan oil, Coconut oil, Olive oil, Rosemary extract, Dimethicone, Aloe Vera Extract, Phenyl Trimethicone, Ginseng Extract, Aloe Vera Extract, Glycerin, Polyquaternium 11, Steareth 2, Steareth 20, DVDM Hydantoin,  Imidazolidinyl Urea, Sodium Carbomer, PEG 150 Disetearate, PEG 12 Dimethicone, Cl 15985/ Yellow 6, Fragrance, Benzyl Benzoate, Benzyl Salicylate, Coumarin, d-Limonene, Heyxl Cinnamal, Lyral, Methyl Ionene Gamma.

I spent around $30 TTD on the product which is roughly $5 USD/BSD.

First impressions


1.      The pudding has a light mango/citrus scent.  I’m not a huge fan of the scent although it’s not overpowering and actually smells very nice.
2.      The color is a light peach!
3.      The product feels very good like a light lotion. It is also not sticky but has an oily feeling which I’d say is due to the number of butters and oils it contains as well as the aloe extract (Aloe vera being an excellent detangler and styler).
4.       After completing a few twist I noticed that it although appeared white on the hair when twisting it dried clear and without residue.

As per the instructions I applied it generously to dry hair. I started from root to tip and I noticed that as I layered the product on my hair became more manageable (I previously had my hair in a low bun and some of it had started to hall up (shrink) towards the center where I have a more defined texture). The kinkier sections of my hair began to "pop" when the product was applied. The 4c sections of my hair gained a ton of hydration and also showed some definition before twisting.  After twisting I noticed that my hair was very soft and felt moisturized. My hair was also not greasy after the twist dried.

Day 2
After sleeping with my bonnet, I removed it and felt my hair. My hair still felt very soft, the twist looked well and were not greasy. My hair remains very moisturized.

I did not have to reapply product to my hair but I still added about a quarter sized amount over my entire hair a few days later. I also unraveled a few twists and noticed amazing definition!

 If using this product for a twistout I think i'd still add a small bit of gel to my hair because my hair frizzes easily. 


Pros
1.      Great price point!
2.      It lives up to its name. The moisture is intense.
3.      The product also detangles the hair which I love. Of course you’d still have to go through with a come or your fingers but as you work it in and your hair becomes more hydrated, detangled and the hair clumps.
4.        It can be used for a mix of textures. (I have a friend who’s also using the product, although natural we do not share the same texture)
. .   The product also boast to be good for transitioners. Since i'm not transitioning I can't try that out specifically but I do feel as though it should be. This would be a good product to add to a transitioning regimen because I feel as though it can make the journey with you from transitioning to fully natural. 

Cons
1.      One of the things I dislike about this product is that it has so many ingredients, most of which I can’t pronounce. I’m sure they serve a purpose but I’d wish the product didn’t include more than 10.


Overall, I’d give this product 4/5 afro picks! It did a great job! I’ll keep using it throughout the semester and try it on wet hair. Don't worry i'll give updates!

Blessings & Love,
Drea 12:9 (242Naturalista)


Thursday, 14 August 2014

Successfully navigating the monthly


Hey guys, I know its been a while but I'm back with another interesting post!


photo cred http://www.undergroundhealth.com/wp-content/uploads/Menstrual-Cramps-Cure.jpg

This post is going to be a little T.M.I. but it's something that we ladies need to talk about! Although I am a med student i'm not going to make this post extremely in depth concerning the cause of symtpoms and those mechanisms involved because in truth I know most of you don't want to hear a bunch of jargon. I am however going to let you in on my tips for success.

Each of us experiences the symptoms of our menses differently, some get bloating some don't. Some of us crawl on the floor because of cramps (i'm guilty), get really angry and irritable, hit walls, can't fit in our clothes, eat a ton of sweets, a ton of chips, pop a bunch of midol and tylenol and try homemade methods. For me I usually get really irritable the week before like REALLY irritable, slightly bloated, sore in the chest, have lower back pain, and cramps. And how can I forget the dreaded pimple that lets everyone know that I'm on my monthly.  I know T.M.I. but if i'm gonna do this post i'm going to have to be honest. I'm always in search of natural products that don't contain a ton of ingredients or products that are multi use, to replace my go to items that aren't the best and are still effective in managing my symptoms. I've never been much of a pill taker but there have been occasions during my monthly where I have resorted to taking pills but I try not to let this happen often because  I've never wanted to be totally dependent on them to get through my monthly. Most of us begin our monthly's at about 12 years of age and don't hit menopause until were about 50. That's a ton of periods in between there and that would be a whole lot of pills. As I'm always trying to find ways to green my life I thought why not this area too. I've already greened my makeup brushes, working on my makeup collection, greening my washing so what about more natural methods of dealing with the cramps and bloating.  This year I really started working on a regimen that I've found to help me during my time of the month and I'm gonna share it with you guys. I feel as though if something's working for one of us we should let others know. So, here are my tips for navigating the monthly!

Tip 1- Cleanse
I find it so weird that before I get my menses I have a strange desire to exercise like more than normal. I mean like hard core exercise (plyometrics )and stretch. I feel kind of weightless and invincible before my menses, no lie.  So a few days before I get any cramping symptoms and I have that extra push to exercise, I usually exercise really well and begin cleansing my body with one of my fave products, organic apple cider vinegar with the "mother". This is the brand I use. I add about a tbsp or two to my water and drink it for a few days. For me this lessons the symptoms I get before my actual period comes and gets rid of the heaviness that comes with the first day. I know you're thinking but its and acid, for me ACV balances my body out and is a great promoter of digestion. I also make sure to follow tip 2.

Tip 2 - Stay hydrated
Most of us get concerned about bloating and think it counter-productive to drink water but that's so not true. Increasing your water intake and decreasing your salt and caffeine intake decreases the chances of bloating. Salt and Caffeine increase stomach acidity which makes cramps worst.  Remaining hydrated helps to reduce the headaches some of us get during our times of the month as well and increases digestion, preventing the water retention we often experience during our times of the month.

Tip 3 - Stretch
I don't do much heavy activity during my first couple days due to my flow but I do stretch until I feel comfortable to start exercising again. Everyone's flow rate is different so if you feel comfortable exercising then by all means do so. Since i'm really not about that life lol, i've found that some light yoga helps with lower back tightness that is common during this time.

Tip 4 -Molasses
Got this tip from HeyFranHey and OMG its amazing. At the sign of cramps I make a cup of tea which is my favourite carrier for molasses. You can however add it to other food stuffs or take a tbsp to the head but for me tea is my favourite not only because i'm a regular tea drinker but also because its kind of warming which instantly makes me feel better. It doesn't really matter what kind of tea, I use what's on hand and that means I often run for a cup of Lipton. I don't add any sweeteners to it but I add about a rounded tsp of molasses and sip on that. Black strap molasses is recommended but I often run for what's on hand and sometimes I simply use unsulfured molasses which does the same thing in my book. It takes about 5-10 minutes to be completely cramp free for me but it does the job and makes me mobile again for a few hours. If the cramps come back I just make another cup. I usually don't have a bad cycle but I do get a bit of PMS and bad cramps for my first day, with a kind of flow. The molasses is a winner in my book! If you want to learn more about it here's a video by  HeyFranHey.

Lastly, if molasses isn't your steeze I also find ginger to be effective.

photo cred: http://www.nlj.gov.jm/FeastingontheHeritage/ginger.jpg

 You can grate some ginger into hot water or tea with a bit of honey and drink that. If you don't have any fresh ginger on hand, you can add a tsp of essence of ginger, it does the same thing. I use this brand of essence of ginger because its readily accessible in the Bahamas and is like under $2. Since your only using a tsp or so it goes a long way.  If you're not a warm beverage drinker you can add a few bananas to your diet. They increase potassium which fights against water retention and also contain a number of anti-cramping nutrients like b6.

I hope these tips help you to Successfully navigate that time of the month. If you have any additional tips that I could try let me know in the comments section below.

XoDrea

Thursday, 5 September 2013

Update

Hey curlies, i know i've been M.I.A. but I promise it's for good reason. I got into medical school and so i'm now trying to begin that med school journey and get settled. I won't have as much free time as I use to before but i'll still have videos and blog post coming for you all each month. If you have any video requests please let me know.

Love you all and thanks for the support!

Wednesday, 24 July 2013

Milk + Honey - Hydrating hair Custard Review

Hey Curlfriends, this post has been months in the making. Like any post that I'm going to do for a product that was sent to me i'm going to place my disclaimer. There has been much talk in the natural hair community about noting products so i want to begin my making sure you understand where I stand in terms of this review.

242Naturalista Disclaimer -This review is 100% my opinion and I was not monetized in any way for a good review. I also blog on hair facts and stories for the company in my spare time because I love sharing the knowledge i've gained with you all.


Milk +Honey hair care sent me their Hydrating Hair Custard for me to review.  I’ve used the product a couple months and now feel it’s the right time to write this review. The product is 98% organic and like other products by their line it is tailor made to 4b-4c kinky hair otherwise termed coarse and coily. This hair type usually requires less manipulation and more moisture and also poses serious shrinkage issues.  The Hydrating hair custard does not contain mineral oil, sulfates, petroleum, gluten or parabens which is great for those of us who are concerned about the ingredients in some of our favorite products.  Moreover, this product is marked cruelty free which indicates that it is never tested on animals and that’s another plus for me.


When I first opened the box I noticed a couple things about the product:

The labeling of this product is very colorful, having a chevron design.
The product came in a box with a card that also featured the chevron design and pointed you towards the company website.


The product is very fragrant but not overpowering. You don’t have to open the bottle in order to smell it.
This custard has a very light creamy consistency and does not contain any dyes.


Special care was also placed into the directions for the product indicating that if in warmer climates (like mine) the product may separate but this does not change the effectiveness of it and can be quickly remedied with a vigorous shake or some chill time in the fridge.  I don’t know about you but I love when companies make note of special things like that.
The ingredient list is pretty lengthy but contains some very good moisturizers and sealants like shea butter, coconut oil and sunflower seed oil. The ingredients are listed below.

Ingredients: Butyrospermum Parkii (Shea Butter), Cocos Nucifera Oil (Coconut Oil), Helianthus Annuus (Sunflower) Seed Oil, Butyrospermum Parkii (Shea) Butter And Elaeis Guineensis (Palm) Butter And Simmondsia Chinensis (Jojoba) Seed Oil And Vaccinium Angustifolium (Blueberry) Fruit, Coffea Arabica Seed Oil (And) Hydrogenated Vegetable Oil (Coffee Butter), Azadirachta Indica (Neem Oil), Prunus Amygdalus Dulcis (Sweet Almond) Oil (And) Hydrogenated Vegetable Oil (Sweet Almond Butter), Aloe Barbadensis Leaf Extract And Canola Oil (Aloe Extract), Persea Gratissima (Avocado) Oil (And) Hydrogenated Vegetable Oil (Avocado Butter), Ricinus Communis Oil (Castor Oil), Theobroma Grandiflorum Seed Butter (Cupuaçu Butter), Cannabis Sativa Seed Oil (And) Hydrogenated Vegetable Oil (Hemp Butter), Behentrimonium Methosulfate (And) Cetearyl Alcohol (Conditioning Emulsifyer), Phenoxyethanol And Caprylyl Glycol (Optiphen), Fragrance


So after reading all of that  here’s what I like and what I don’t like.

Pros
-          The product has a bubblegum scent and some fruity notes which smells great. However, the scent is not overpowering and can last through two weeks of a twist/twistout.
-          Although the product is light, when used it really coats the hair and does not leave a film on the hair as some would expect due to its list of butters.
-          This product also lightly detangles and smoothes through hair very nicely. This allows for it to give way to extra defined twists/ braids.
-          Like its name implies it is very moisturizing. “Hydrating Hair Custard is great for quenching brittle and dry natural hair. This creamy custard blend works to embellish natural tresses while giving thirsty coils the nutrients needed for growth and nourishment.  ”
-          You don’t need to seal over this product with oil. When you take down your hair it will be very shiny and will not crunch.

Cons
Like most organic products, it may get a little pricey when compared to other non organic products. ($18 for 6 oz)
Also when twisting/ braiding hair, I usually have to squeeze out some of the product onto a jar in order for me to reapply product to the ends of my hair. This is a bit inconvenient in my opinion. The bottle does contain a pop top which is great for distributing product evenly but can make for difficulty when trying to seal those ends with product.

Overall this product is really great even though I’ve had developed ways of stretching this product lol.  I’ve found that when using this product you don’t have to be extra generous. As you section your hair apply a dollop sized amount based on the section and work it through. You want to also pay special attention to the ends of the hair which is the oldest and most dry part. By sectioning hair and using a dollop sized amount you will conserve product. I love that the hydrating hair custard has great moisture content, can be used to complete a number of hairstyles not just twists or braids and that it focuses on us coily and coarse haired lady’s.

 The pros outweigh the cons for me and so this product gets notable mention . I’m not just hyping a product line I believe in sharing the wealth about really great products and this one is no different. Milk and Honey is a part of the Barefruit Company and its an organic line created by Tasha Branham.
To check out more Milk + Honey hair products visit their website http://www.milkandhoneyhair.com/

All portions in grey were taken directly from the milk and honey haircare website.

Don't forget to connect with me:
Facebook/Twitter/Youtube - 242Naturalista

Wednesday, 19 June 2013

Update- Lifestyle change

So I know I haven't posted for a while. So much is on my mind right now, planning to head back to school, tweaking my eating preferences, job hunting, gardening, exploring mineral makeup. You name it, it's probably there lol. 


One of the things I wanted to mention was my lifestyle change, cause for me this won't be a diet. "Palean".  I have no known allergies/intolerance's towards any foods but as i've gotten older, like most people my preferences have changed.  I no longer appreciate the taste of whole milk and so i rarely use it. I've also given up pork products a couple years back. I've also discovered that certain foods cause particular flair ups on my skin and eyes, during certain times of the year and i want to see if food can reverse it. Something that men of you don't know about me is that I am big on health and achieving wellness the good old fashioned way.

 Beginning next month I'll be exploring a paleo lifestyle, (grain free, refined sugar free).  Don't know what that is? Well the paleo diet basically is a way of eating in which you mimic the food choices/groups of our ancestors who lived during the paleolithic era (hunter-gatherers). Most people subscribe to this diet because of medical conditions such as  SCD (Specific Carbohydrate Disease), Celiac Disease etc. This "diet" is not as restricting as it seems. The first list comprises foods you can eat, the second are things to avoid.

  • Grass-produced meats
  • Fish/seafood
  • Fresh fruits and veggies
  • Eggs
  • Nuts and seeds
  • Healthful oils (Olive, walnut, flaxseed, macadamia, avocado, coconut)


There are so many websites that are tailored to folks wanting to explore this lifestyle because in the beginning it is a bit overwhelming attempting to eliminate grains. (Grains are in everything- got to read food labels). It helps one to boost their veggie intake, which in my opinion is a good thing. I currently dont' eat terribly but I do need more energy, I carb load and crave sugar, so this will be my way of testing out my body, more or less. My culture is one that definitely carb loads. We eat at least 3 starchy products at one meal and I'm working towards being healthier for my future. Wish me luck on this journey. I am not saying that this change in my life is going to be easy but I like challenge and as i mentioned prior i'm working towards being healthier. I will be blogging about my Paleo experience as well as recipes that I love and some of my cultural dishes that I have tweaked like Conch dishes etc. 

 Please, as a future health care professional, if you have any illnesses etc, please speak with your physician and most importantly do your research. I am not taking on this new lifestyle lightly i've been researching for months. 

Helpful blogs

Thanks for reading. See you soon! 
Blessings & Love Drea12:9

Don't forget to follow me on Twitter, Like me on Facebook and Subscribe on Youtube - 242Naturalista


Monday, 27 May 2013

Short Natural hair - Life post big chop part 1

Hey loves, i know its been a while but i'm back with another post.
I've been rocking a curly fro ever since last week...Why? because I big chopped honey!


I big chopped my hair May 16th, 2013 after transitioning for 1 year. I did not go to a salon, I had my mom do it for me. I chose not to do it myself because I was in a giddy mood and may have gotten a little scissor happy. My mom did get a little scissor happy on one side so i have to definitely hit up my barber. If you choose to big chop yourself you should either see a stylist or barber afterwards for a quick trim otherwise you will have to keep trimming a few times after your chop. This is because even with your hair loaded with conditioner you may not see all of those straggly relaxed ends.

Post big chop
I had about 6 inches of hair on my head. I have way more hair in my crown area which also has my tightest curl pattern. Around the edges of my hair is pretty loose but I don't mind that at all (a little over 4 inches). I'm not going to go into curl specifics because I love my hair. I don't want to put labels on it or allow others to project on me what my hair should be or what it isn't because its not like theirs.

What to expect when you Big Chop
1. A serious case of HIMH
Don't look at me like that...I'm sure you know what HIMH is..If not its Hand in my hair syndrome lol copped that from Mae of Naturalchica.com....I honestly cannot stop touching my hair...It feels amazing. It feel so different from what i'm used to in a really good way.

2. A big shock
Depending on when you big chop you may have to get used to your hair..and i'm not talking about getting used to its dopeness lol but use to your hair. You may see another natural who transitioned or big chopped when you did and it may be great to look at their journey and what they did but all in all you have to love your own hair. God gave it to you and it may not respond like everyone's.  So chopping your hair and thinking your going to look like the next natural is the wrong place to start. My big shock was the fact that I can actually rock my natural hair and it doesn't look so-so. I actually look good with it. I say it like that because if you read my hair story you would know that I haven't really seen my natural hair from I was very young (got a perm early).

Everyone's big chop experience is different. What was yours like?

Find me on
Facebook / Twitter/ Youtube - 242Naturalista

Side note

After big chopping I also wondered whether too much heat was used on my hair for my graduation photos. I had a slight big of heat damage on a section in the front of my head. I made the decision not to put direct heat on my hair for another 3 years. I may go longer than that but for right now its 3 years.

Flat twist out using Milk + Honey hair care's hydrating hair custard! Smells amazing review coming soon!

In part 2 I'll discuss going to the barber and my trim experience!

Find me on
Facebook / Twitter/ Youtube - 242Naturalista

Sunday, 7 April 2013

Hair update

Hey loves, so while co-washing and deep conditioning my hair this week I decided to take a few pics to show you all my curl pattern and how my hair is coming along. I will be posting an update video really soon! 


Dirty Hair full of conditioner (pre-poo)!

Curls after rinsing out the conditioner

Deep conditioner


Close up of my kinks


Don't forget to Like me on Facebook, Follow me on Twitter and Subscribe to me on Youtube!- 242Naturalista

L.A.Colors single eye-shadow review

Hey loves, so I just wanted to share with you something and its not a hair posts. I had a bit of retail therapy over the weekend and decided to pick up some new eye shadows to add to my collection. So I walked in this store and saw a bunch of L.A.Colors products and thought yano what i'm going to give them a try. Ain't no harm in trying right? lol

Well anywhoo, I heard about the products by l.a.colors and l.a.girl from a girlfriend of mine. She loves their eye-shadows and they make up the base of what she uses on her face. Not only are they cheap, which helps us out as college students but they also have good color pay off.

I picked up 4 single shades for $1.99 each...I know that's like $0.99 more than in the states but this is the Bahamas people. They also had the trio's and quads etc but I wasn't really that interested in them. I gravated towards the shades that just spoke to me. The shades I chose were fabulous teal, sunshine, periwinkle and fuschia (not pictured).

Color swatches only (no base)

So in honor of Easter, I tried a simple look. Fabulous teal reminds me a bit of the water in the Bahamas so I think that's right now my favorite color.

So onto the look I created.


Pros
1. Cheap
2. Very pigmented
3. Great for packing color onto the lid
4. Blends easily
5. Company is cruelty free

Cons
1. A little cakey

Overall I really like the colors and this product. These would be essential for any beginner and for those who want to test out different looks and improve their technique. Not every product in your arsenal has to be costly, some can be really cheap and when applied correctly can make you look like really beautiful.

Hope this helps you all out!
XoDrea12:9

Find me on Facebook/Twitter/ Youtube - 242Naturalista

Thursday, 28 March 2013

The Great Graduation Hair Debate


Hey loves I know its been a while...but I have been doing lots and lots of thinking. As graduation season approaches, i've been thinking really hard about hairstyles that would suit my head and especially that 
LOL! So this is the GGHD! Didn't know this one existed right. Lol it does if only in the mind of the natural/transitioning hair community. 

Graduation is a time in our lives when we want to feel appreciated for our hard work during our tenure in school. For such a happy time a lot of us get really flustered not by the chemistry, calculus or accounts but by our hair, plain and simple. We may have gotten by by protective styling up until that point and want something a little different on that day. So with that said i'm here to offer a few tips the biggest one being getting around that HAT!

Graduation styles definitely have to incorporate that hat. During this season it becomes a bit harder for naturals who are heat free, have "the awkward" length hair and those that are transitioning. Like myself, being relatively heat free excluding the use of my hair dryer for deep conditioning treatments. In any event, whatever stage you are with your hair there are options. In my opinion most people think of it as two big decisions and you decide which camp you fall into. I'm not even going to bring in the "I'm revisiting the creamy crack" cause if you really want to be natural that's not the way to go. So here are the two arguments.

1. To use heat or not to use heat
2. To weave or not to weave ............that is the question? lol

I know I know, pun intended but seriously that's what graduation day hair usually breaks down into. Using heat or other methods to lay our hair down or using a weave to protect our hair from the excess heat.

I'm not going to tell anyone how they should style there hair for graduation or much less grad pictures but I hope to offer a couple solutions that will help anyone in this situation.

1. Weave it- Weaves are an excellent protective style when persons do not forge to take care of their natural hair underneath

2. Low bun - You can always rock a low bun. The length of your hair will determine a lot of factors about that bun such as its size and style. For shorter hair you can always supplement your bun using marley braiding  (more defined) hair or kanekelon hair (less defined) depending on your hair texture.

3. A braid out/ coccoon curl/ flat twist out - These are so pretty but you do have to be careful. Your hair cannot be too high in the crown to prevent the graduation hat from staying on your head. So don't fluff the crown area too much. Also don't forget to use bobby pins to keep that hat LAID! lol 

4. Flat iron- If you are going this route, please, please, please use a heat protectant, although they do not protect your hair 100%, heat protectants do offer your hair a great deal of protection. 


Whatever you decide make sure you are comfortable with it because you will have to look back at the pictures from that day. Naptural85 also has a great video with some graduation hair ideas, so feel free to check out her channel.

Hope this article was helpful to you.

Blessings & Love Drea

Don't forget to connect with me
Facebook/Twitter/ Youtube - 242Naturalista